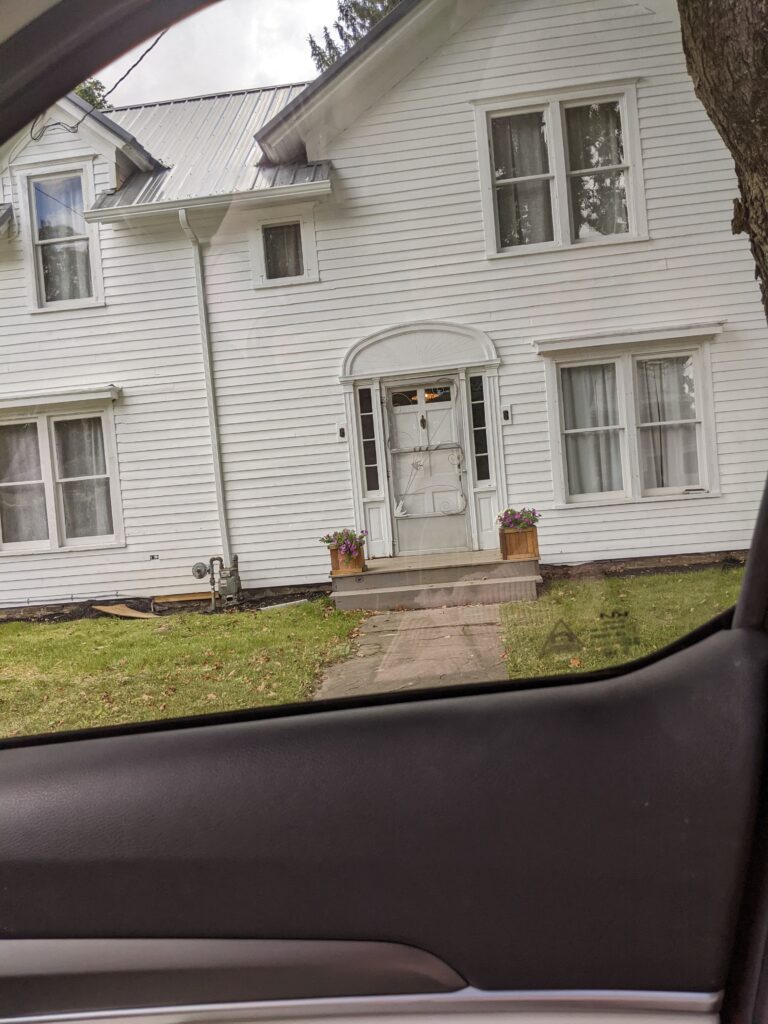
Our New to us 1890’s Colonial Style House
We have officially closed on our “new to us” home in my rural hometown. We are in the planning stages of a modest remodel. We hope to start renovations by April. Until then, I will be doing small DIY projects that I’ll document on the blog with lots of photos.
We are planning to keep the charm and original character but there are some things that need to be updated or changed.
First up, the upstiars half bath. It’s a huge room but only has a toilet, a half wall and a vanity/sink in it. The toilet and sink are 1950’s baby blue. There is even a package of baby blue charmin toilet paper, a tissue box cover, a soap dish, and mouth wash cups that were left in the house. I have made a display of other things left in the house inside of the built in cabinet in the dinning room and may also make some kind of display of these items after we remodel this bathroom. I really do want to keep the character and charm of this house in tact, as much as I possibly can.
I plan to keep those (the blue toilet and sink/vanity) in the bathroom and apparently, if I really wanted to keep that style, I could order a baby blue shower or tub. That will take longer though and be very expensive, so we’ve opted for a white 4 piece walk in shower with a seat and safety rails (for my in-laws and my Mom in case she ever needs to move in with us). It’s always good to try and look ahead and plan for the possible outcomes that could be in the not so distant future, right!?!
The upstairs bathroom walls are clad in dark 100% wood paneling, you know the old school kind, that is actually made out of wood. Not ideal for a bathroom that I want my two boys to start using to bath and shower in. We will be taking the walls down to the studs, to check the insulations and then cover them back up with drywall and maybe some tile aroudn the sink area. Nothing too drastic, but lightening the room up a bit for sure. I’m keeping the original light fixture too.
We also have 100% wood paneling in the kids “sleeping” room (more on that later) – it’s attached to their play room and also in my husband’s office. We are keeping the paneling in the office. My husband wants a dark and moody office (maybe to match his moods after buying yet another house that needs renovated!?!) Ha-ha! I do plan to prime and paint the paneling in my kids’ sleeping room and make a few minor changes in there. It’s very small, so the changes won’t be costly or take that long. Think 1 gallon of primer and 1 gallon of paint plus some storage solutions for clothing and a few books. They currently share that room and enjoy sleeping in their bedroom together. Until they ask for seperate rooms, we are keeping it this way. There are plans to make it a very cool sleeping area. Stay tuned for that, probably over the summer.
In the meantime, I have completed a couple of very small, affordable and easy projects. I will detail those and add before and after photos, so you can see how much better the small changes have made so far.
Updating the vanity in the corner of my main floor bathroom:
Before, the vanity was painted white and it didn’t have any personality. So, I ordered some countertop peel and stick contact paper from Amazon and used a wallpaper applicator to peel it off and squeegee the airbubbles out of the contanct paper. I then used a heat gun, to secure the contact paper around the edges and below the counter top. It’s not perfect, but it looks much more elevated and elegant than it did before.

Vanity Stool Before

Vanity Stool After

Corner vanity area in main floor bathroom – After
To keep with the vintage look and feel, I purchased a two tiered brass and white plastic shelf (Amazon) that sits on the vanity to display my vintage and everyday perfume boottles, a vintage talc bottle that I found at an antique store and my cotton pads in a pretty jar with a top from the Dollar Tree on it. I also purchased a vintage vanity stool that was white and covered it in the soft, blush colored fabric I found at Hobby Lobby. I didn’t even need to use a staple gun for this recovering project, I just tightened the screws enough and cut the fabric short, so that it would stay taught on the stool. I love the look and it really goes well with the original, vintage wall paper, which I’m trying to keep!
Stay tuned…next up, our mudroom update that was also affordable and super easy!

Front of our new to us 1890’s Colonial Home